# yaml-language-server: $schema=https://schema.zeabur.app/template.json
apiVersion: zeabur.com/v1
kind: Template
metadata:
name: MongoDB
spec:
description: A source-available, cross-platform, document-oriented database program.
coverImage: https://miro.medium.com/v2/resize:fit:1200/0*BmLKgrU_qFtakYsB.png
icon: https://cdn.zeabur.com/marketplace/mongodb.svg
tags:
- Database
readme: |-
MongoDB is an open source NoSQL database management program. NoSQL (Not only SQL) is used as an alternative to traditional relational databases. NoSQL databases are quite useful for working with large sets of distributed data. MongoDB is a tool that can manage document-oriented information, store or retrieve information.
MongoDB is used for high-volume data storage, helping organizations store large amounts of data while still performing rapidly. Organizations also use MongoDB for its ad-hoc queries, indexing, load balancing, aggregation, server-side JavaScript execution and other features.
## Environment variables
You can access the following environment variables in your other services in the same project:
- `MONGO_CONNECTION_STRING`: The connection string to connect to your MongoDB.
- `MONGO_HOST`: The hostname of your MongoDB.
- `MONGO_PASSWORD`: The password of your MongoDB.
- `MONGO_PORT`: The port of your MongoDB.
- `MONGO_URI`: The connection string to connect to your MongoDB.
- `MONGO_USERNAME`: The username of your MongoDB.
You can use these environment variables in your other services to connect to your MongoDB.
## Connecting to your MongoDB
There are two useful tools to connect to and operate your MongoDB:
- [MongoDB Compass](https://www.mongodb.com/products/compass): A GUI tool to connect to your MongoDB.
- [mongosh](https://www.mongodb.com/docs/mongodb-shell/): A shell tool to connect to your MongoDB.
### MongoDB Compass
[MongoDB Compass](https://www.mongodb.com/products/compass) is an interactive tool "for querying, optimizing, and analyzing your MongoDB data, and allow getting key insights, dragging and droping to build pipelines, and more".
Once you have downloaded and installed it according to the official documentation, go back to your Zeabur dashboard. Click on the Connections tab in the MongoDB service, and click the eye icon to copy the connection string.
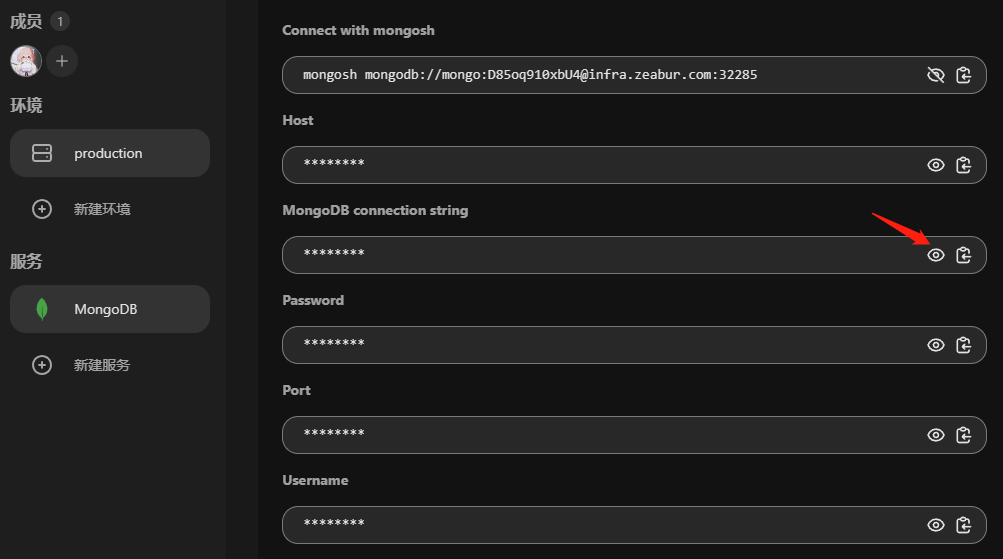
Paste the copied content into the URI input box:
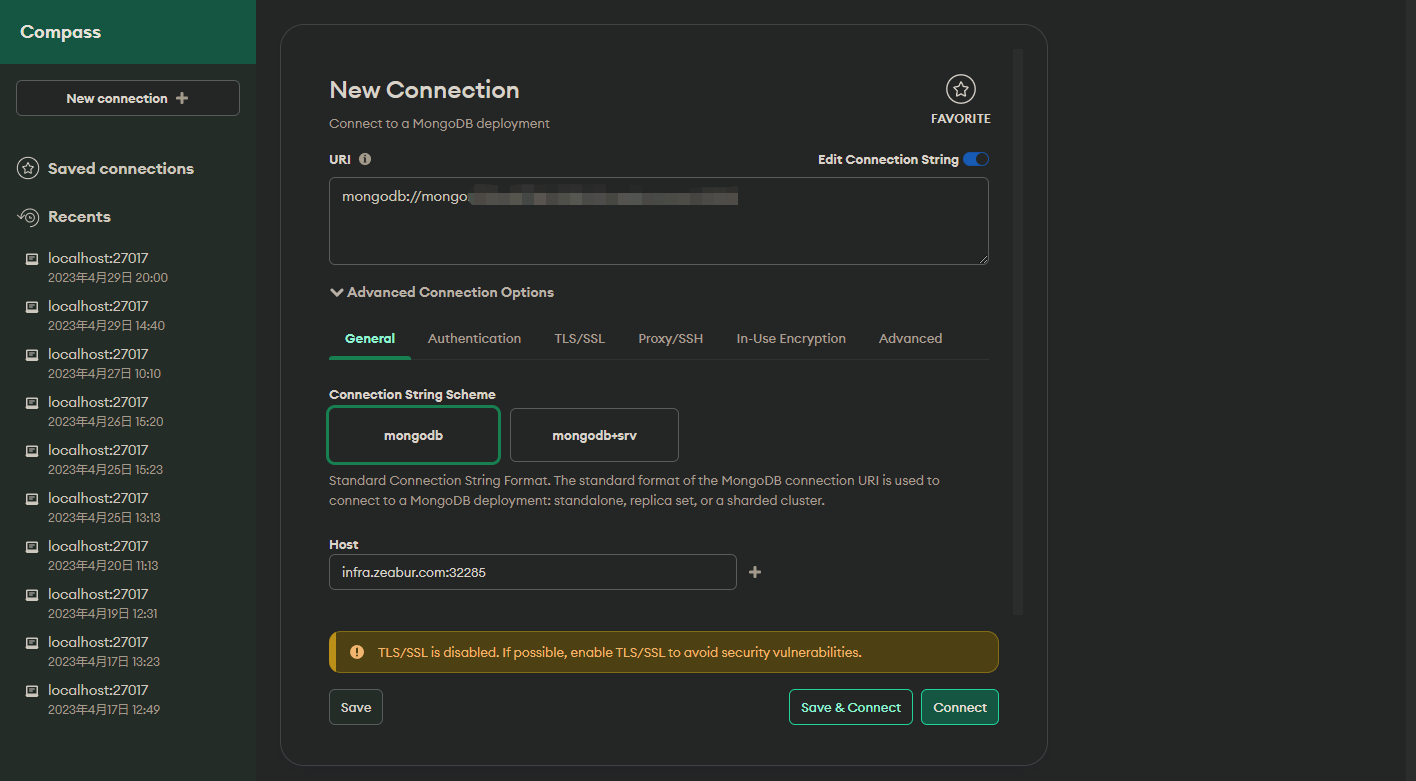
Choose `Save & Connect` or `Connect` according to your needs, and now you can start to operate MongoDB.
### mongosh
[mongosh](https://www.mongodb.com/docs/mongodb-shell/) is a fully-featured JavaScript and Node.js REPL environment for interacting with MongoDB databases.
Once you have downloaded and installed it according to the documentation, go back to your Zeabur dashboard. Click on the Connections tab in the MongoDB service, and click the eye icon to copy the connection string.

```bash
mongosh mongodb://<YOUR_CONNECT_PATH>
```
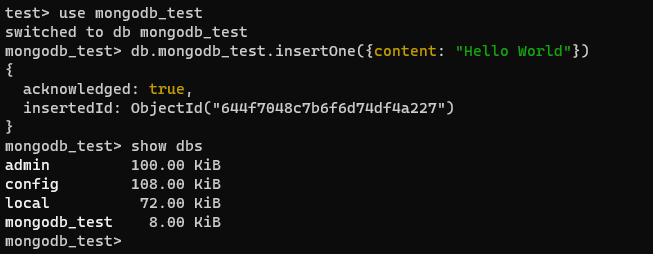
Replace `<YOUR_CONNECT_PATH>` with the connection string you just copied, and we can use the following command to test if the connection is successful:
```bash
use mongodb_test
db.mongodb_test.insertOne({content: "Hello World"})
show dbs
```
If successful, it should return:
Then we can `drop` the test database.
```bash
use mongodb_test
db.drop()
```
services:
- name: mongodb
icon: https://cdn.zeabur.com/marketplace/mongodb.svg
template: PREBUILT
spec:
source:
image: mongo:7.0
command:
- sh
args:
- -c
- sed -i '10,23d' /usr/local/bin/docker-entrypoint.sh && exec docker-entrypoint.sh mongod
ports:
- id: database
port: 27017
type: TCP
volumes:
- id: data
dir: /data/db
instructions:
- title: Command to connect to your MongoDB
content: mongosh "mongodb://${MONGO_USERNAME}:${MONGO_PASSWORD}@${PORT_FORWARDED_HOSTNAME}:${DATABASE_PORT_FORWARDED_PORT}"
- title: MongoDB connection string
content: mongodb://${MONGO_USERNAME}:${MONGO_PASSWORD}@${PORT_FORWARDED_HOSTNAME}:${DATABASE_PORT_FORWARDED_PORT}
- title: MongoDB username
content: ${MONGO_USERNAME}
- title: MongoDB password
content: ${MONGO_PASSWORD}
- title: MongoDB host
content: ${PORT_FORWARDED_HOSTNAME}
- title: MongoDB port
content: ${DATABASE_PORT_FORWARDED_PORT}
env:
MONGO_CONNECTION_STRING:
default: mongodb://${MONGO_USERNAME}:${MONGO_PASSWORD}@${MONGO_HOST}:${MONGO_PORT}
expose: true
MONGO_HOST:
default: ${CONTAINER_HOSTNAME}
expose: true
MONGO_INITDB_ROOT_PASSWORD:
default: ${PASSWORD}
MONGO_INITDB_ROOT_USERNAME:
default: mongo
MONGO_PASSWORD:
default: ${MONGO_INITDB_ROOT_PASSWORD}
expose: true
MONGO_PORT:
default: ${DATABASE_PORT}
expose: true
MONGO_URI:
default: ${MONGO_CONNECTION_STRING}
expose: true
MONGO_USERNAME:
default: ${MONGO_INITDB_ROOT_USERNAME}
expose: true
localization:
es-ES:
description: Un programa de base de datos orientado a documentos, multiplataforma y con código fuente disponible.
readme: |-
MongoDB es un programa de gestión de bases de datos NoSQL de código abierto. NoSQL (Not only SQL) se utiliza como una alternativa a las bases de datos relacionales tradicionales. Las bases de datos NoSQL son muy útiles para trabajar con grandes conjuntos de datos distribuidos. MongoDB es una herramienta que puede gestionar información orientada a documentos, almacenar o recuperar información.
MongoDB se utiliza para el almacenamiento de datos a gran escala, ayudando a las organizaciones a almacenar grandes cantidades de datos mientras mantiene un rendimiento rápido. Las organizaciones también usan MongoDB por sus consultas ad-hoc, indexación, balanceo de carga, agregación, ejecución de JavaScript del lado del servidor y otras características.
## Variables de entorno
Puedes acceder a las siguientes variables de entorno en otros servicios del mismo proyecto:
- `MONGO_CONNECTION_STRING`: La cadena de conexión para conectarse a tu MongoDB.
- `MONGO_HOST`: El nombre de host de tu MongoDB.
- `MONGO_PASSWORD`: La contraseña de tu MongoDB.
- `MONGO_PORT`: El puerto de tu MongoDB.
- `MONGO_URI`: La cadena de conexión para conectarse a tu MongoDB.
- `MONGO_USERNAME`: El nombre de usuario de tu MongoDB.
Puedes usar estas variables de entorno en tus otros servicios para conectarte a tu MongoDB.
## Conectándote a tu MongoDB
Hay dos herramientas útiles para conectarte y operar tu MongoDB:
- [MongoDB Compass](https://www.mongodb.com/products/compass): Una herramienta GUI para conectarte a tu MongoDB.
- [mongosh](https://www.mongodb.com/docs/mongodb-shell/): Una herramienta de shell para conectarte a tu MongoDB.
### MongoDB Compass
[MongoDB Compass](https://www.mongodb.com/products/compass) es una herramienta interactiva "para consultar, optimizar y analizar los datos de tu MongoDB, permitiendo obtener información clave, arrastrar y soltar para construir pipelines, y más".
Una vez que lo hayas descargado e instalado según la documentación oficial, regresa a tu panel de Zeabur. Haz clic en la pestaña de Conexiones en el servicio de MongoDB y haz clic en el icono del ojo para copiar la cadena de conexión.

Pega el contenido copiado en el cuadro de entrada URI:

Elige `Save & Connect` o `Connect` según tus necesidades, y ahora puedes empezar a operar MongoDB.

### mongosh
[mongosh](https://www.mongodb.com/docs/mongodb-shell/) es un entorno REPL completo de JavaScript y Node.js para interactuar con bases de datos MongoDB.
Una vez que lo hayas descargado e instalado según la documentación, regresa a tu panel de Zeabur. Haz clic en la pestaña de Conexiones en el servicio de MongoDB y haz clic en el icono del ojo para copiar la cadena de conexión.

```bash
mongosh mongodb://<YOUR_CONNECT_PATH>
```
Reemplaza `<YOUR_CONNECT_PATH>` con la cadena de conexión que acabas de copiar, y podemos usar el siguiente comando para probar si la conexión es exitosa:
```bash
use mongodb_test
db.mongodb_test.insertOne({content: "Hello World"})
show dbs
```
Si tiene éxito, debería devolver:

Luego podemos `drop` la base de datos de prueba.
```bash
use mongodb_test
db.drop()
```
ja-JP:
description: ソースコードが公開されている、クロスプラットフォームでドキュメント指向のデータベースプログラム。
readme: |
MongoDB はオープンソースの NoSQL データベース管理プログラムです。NoSQL(Not only SQL)は、従来のリレーショナルデータベースの代替として使用されます。NoSQL データベースは、大規模な分散データセットを扱うのに非常に便利です。MongoDB は、ドキュメント指向の情報を管理し、保存または取得するためのツールです。
MongoDB は、大量データの保存に使用され、データを大量に保存しながらも迅速に動作することを可能にします。また、MongoDB はアドホッククエリ、インデックス作成、負荷分散、集計、サーバーサイド JavaScript の実行などの機能のためにも利用されています。
## 環境変数
同じプロジェクト内の他のサービスで以下の環境変数にアクセスできます:
- `MONGO_CONNECTION_STRING`: MongoDB に接続するための接続文字列。
- `MONGO_HOST`: MongoDB のホスト名。
- `MONGO_PASSWORD`: MongoDB のパスワード。
- `MONGO_PORT`: MongoDB のポート番号。
- `MONGO_URI`: MongoDB に接続するための接続文字列。
- `MONGO_USERNAME`: MongoDB のユーザー名。
他のサービスでこれらの環境変数を使用して MongoDB に接続することができます。
## MongoDB への接続
MongoDB に接続して操作するための便利なツールが 2 つあります:
- [MongoDB Compass](https://www.mongodb.com/products/compass): MongoDB に接続するための GUI ツール。
- [mongosh](https://www.mongodb.com/docs/mongodb-shell/): MongoDB に接続するためのシェルツール。
### MongoDB Compass
[MongoDB Compass](https://www.mongodb.com/products/compass) は、MongoDB データの「クエリ、最適化、分析を行い、重要な洞察を得たり、ドラッグ&ドロップでパイプラインを構築したりするためのインタラクティブなツール」です。
公式ドキュメントに従ってダウンロードしてインストールが完了したら、Zeabur ダッシュボードに戻ります。MongoDB サービスの「Connections」タブをクリックし、目のアイコンをクリックして接続文字列をコピーします。

コピーした内容を URI 入力欄に貼り付けます:

必要に応じて「Save & Connect」または「Connect」を選択し、MongoDB の操作を開始できます。

### mongosh
[mongosh](https://www.mongodb.com/docs/mongodb-shell/) は、MongoDB データベースとやり取りするための完全な機能を備えた JavaScript および Node.js REPL 環境です。
公式ドキュメントに従ってダウンロードしてインストールが完了したら、Zeabur ダッシュボードに戻ります。MongoDB サービスの「Connections」タブをクリックし、目のアイコンをクリックして接続文字列をコピーします。

```bash
mongosh mongodb://<YOUR_CONNECT_PATH>
```
`<YOUR_CONNECT_PATH>` を先ほどコピーした接続文字列に置き換え、次のコマンドを使って接続が成功するかテストできます:
```bash
use mongodb_test
db.mongodb_test.insertOne({content: "Hello World"})
show dbs
```
接続が成功した場合、次のような結果が返されます:

その後、テストデータベースを削除できます。
```bash
use mongodb_test
db.drop()
```
zh-CN:
description: 一个开源、跨平台、面向文档的数据库程序。
readme: |
MongoDB 是一个开源的 NoSQL 数据库管理程序。NoSQL(不仅仅是 SQL)被用作传统关系型数据库的替代方案。NoSQL 数据库在处理大规模分布式数据集方面非常有用。MongoDB 是一个可以管理面向文档信息、存储或检索信息的工具。
MongoDB 被用于高容量数据存储,帮助组织在存储大量数据的同时仍能快速执行。组织还使用 MongoDB 进行临时查询、索引、负载均衡、聚合、服务器端 JavaScript 执行和其他功能。
## 环境变量
你可以在同一项目的其他服务中访问以下环境变量:
- `MONGO_CONNECTION_STRING`:连接到 MongoDB 的连接字符串。
- `MONGO_HOST`:MongoDB 的主机名称。
- `MONGO_PASSWORD`:MongoDB 的密码。
- `MONGO_PORT`:MongoDB 的端口。
- `MONGO_URI`:连接到 MongoDB 的连接字符串。
- `MONGO_USERNAME`:MongoDB 的用户名。
你可以在其他服务中使用这些环境变量来连接到你的 MongoDB。
## 连接到你的 MongoDB
有两个实用工具可以连接和操作你的 MongoDB:
- [MongoDB Compass](https://www.mongodb.com/products/compass):连接 MongoDB 的图形化界面工具。
- [mongosh](https://www.mongodb.com/docs/mongodb-shell/):连接 MongoDB 的命令行工具。
### MongoDB Compass
[MongoDB Compass](https://www.mongodb.com/products/compass) 是一个交互式工具,用于"查询、优化和分析你的 MongoDB 数据,并能获得关键洞察、拖放创建管道等功能"。
当你按照官方文档下载并安装完成后,回到你的 Zeabur 仪表板。点击 MongoDB 服务中的连接标签,并点击眼睛图标来复制连接字符串。

将复制的内容粘贴到 URI 输入框中:

根据你的需求选择“保存并连接”或“连接”,现在你就可以开始操作 MongoDB 了。

### mongosh
[mongosh](https://www.mongodb.com/docs/mongodb-shell/) 是一个功能完整的 JavaScript 和 Node.js REPL 环境,用于与 MongoDB 数据库交互。
当你按照文档下载并安装完成后,回到你的 Zeabur 仪表板。点击 MongoDB 服务中的连接标签,并点击眼睛图标来复制连接字符串。

```bash
mongosh mongodb://<你的连接路径>
```
将 `<你的连接路径>` 替换为你刚刚复制的连接字符串,我们可以使用以下命令来测试连接是否成功:
```bash
use mongodb_test
db.mongodb_test.insertOne({content: "Hello World"})
show dbs
```
如果成功,应该会返回:

然后我们可以删除测试数据库。
```bash
use mongodb_test
db.drop()
```
zh-TW:
description: 一個開源、跨平台、面向文件的資料庫程式。
readme: |
MongoDB 是一個開源的 NoSQL 資料庫管理程式。NoSQL(不僅僅是 SQL)被用作傳統關聯式資料庫的替代方案。NoSQL 資料庫在處理大規模分散式資料集方面非常有用。MongoDB 是一個可以管理面向文件資訊、儲存或檢索資訊的工具。
MongoDB 被用於高容量資料儲存,幫助組織在儲存大量資料的同時仍能快速執行。組織還使用 MongoDB 進行臨時查詢、索引、負載平衡、聚合、伺服器端 JavaScript 執行和其他功能。
## 環境變數
你可以在同一專案的其他服務中存取以下環境變數:
- `MONGO_CONNECTION_STRING`:連接到 MongoDB 的連線字串。
- `MONGO_HOST`:MongoDB 的主機名稱。
- `MONGO_PASSWORD`:MongoDB 的密碼。
- `MONGO_PORT`:MongoDB 的連接埠。
- `MONGO_URI`:連接到 MongoDB 的連線字串。
- `MONGO_USERNAME`:MongoDB 的使用者名稱。
你可以在其他服務中使用這些環境變數來連接到你的 MongoDB。
## 連接到你的 MongoDB
有兩個實用工具可以連接和操作你的 MongoDB:
- [MongoDB Compass](https://www.mongodb.com/products/compass):連接 MongoDB 的圖形化介面工具。
- [mongosh](https://www.mongodb.com/docs/mongodb-shell/):連接 MongoDB 的命令列工具。
### MongoDB Compass
[MongoDB Compass](https://www.mongodb.com/products/compass) 是一個互動式工具,用於「查詢、最佳化和分析你的 MongoDB 資料,並能獲得關鍵洞察、拖放建立管道等功能」。
當你按照官方文件下載並安裝完成後,回到你的 Zeabur 儀表板。點擊 MongoDB 服務中的連線分頁,並點擊眼睛圖示來複製連線字串。

將複製的內容貼到 URI 輸入框中:

根據你的需求選擇「儲存並連線」或「連線」,現在你就可以開始操作 MongoDB 了。

### mongosh
[mongosh](https://www.mongodb.com/docs/mongodb-shell/) 是一個功能完整的 JavaScript 和 Node.js REPL 環境,用於與 MongoDB 資料庫互動。
當你按照文件下載並安裝完成後,回到你的 Zeabur 儀表板。點擊 MongoDB 服務中的連線分頁,並點擊眼睛圖示來複製連線字串。

```bash
mongosh mongodb://<你的連線路徑>
```
將 `<你的連線路徑>` 替換為你剛剛複製的連線字串,我們可以使用以下指令來測試連線是否成功:
```bash
use mongodb_test
db.mongodb_test.insertOne({content: "Hello World"})
show dbs
```
如果成功,應該會回傳:

然後我們可以刪除測試資料庫。
```bash
use mongodb_test
db.drop()
```